Showing posts with label software. Show all posts

Tuesday, July 8, 2014

Share a hard drive with everyone on your Wi-Fi network

Take advantage of your router's USB port with a little trick that lets you share a hard drive with anyone on your Wi-Fi network.
Cloud storage is expensive, but it's not the only way to share a bunch of files across many devices. Instead, you can use an external hard drive and your router to create networked storage accessible to anyone on your Wi-Fi network.
When it's set up, any files stored on that drive can be accessed by all devices on your network -- even phones and tablets. Here's how to set it up on Windows.

Step 1: Choose your drive

The drive you share can be as small as thumb drive, or as large as a 3TB external hard drive. Check your router's manual to find out if there are any storage limitations, since some routers have a storage cap.
Once you've chosen your drive, plug it in.

Step 2: Enable USB drive sharing

On any computer connected to your Wi-Fi network, launch a browser, and navigate to your router's IP address. You can find this on the back of the router, in the device manual, or by searching for it online. In most cases, it looks like 192.168.X.X.
When the page loads, you'll be asked to log in with your username and password. If you changed it, you should know it. If you didn't, it's probably still admin (username), and admin (password).
Those who fall into the latter category, please change your password as soon as you can, and before proceeding to the next step.
Every router's interface is different, but if yours has a USB port, you'll find a link entitled something likeFile Sharing under the Administrator settings. In this window, enable the file sharing server (also called SAMBA). Apply the settings, and exit.
enablefilesharing.jpg
Screenshot/Sharon Profis

Step 3: Access the drive

You're now ready to read and write to your attached hard drive. Open a file explorer window, and navigate to the Network folder in the left sidebar. Then, clear out the path at the top of the explorer window, and enter \\[your IP address]. So, for example, it might look like: \\192.168.1.1
networkfolder.jpg
Screenshot/Sharon Profis
With that, your drive will appear. Open it to access its contents, just like any other folder. If you're asked to log in, simply use your router's login credentials (the same one used to log into the Web interface.)
If you plan on leaving your hard drive attached, so that you can easily access it from any Explorer window. To do that, right-click the drive and select "Map network drive..." Give it a name, and the folder will appear in the sidebar.
mapdrive.jpg
Screenshot/Sharon Profis
To access the drive on other computers on the network, repeat step 3.

Thursday, July 3, 2014

Microsoft flips switch on new webmail encryption

Microsoft has pulled back the curtain on its implementation of tougher encryption standardsfor Web-based email and some cloud services, the company announced Tuesday.
In the works for more than six months, Microsoft has now activated Transport Layer Security encryption (TLS) for its webmail services at Outlook.com, Hotmail.com, Live.com, and MSN.com. This means it will be significantly harder for email originating from and being sent to a Microsoft account to be spied on, as long as the connecting email service also uses TLS.
Matt Thomlinson, vice president of Microsoft's Trustworthy Computing division, said that this work is part of a "comprehensive engineering effort to strengthen encryption."
"This effort also helps us reinforce that governments use appropriate legal processes, not technical brute force, if they want access to that data," he said.
Although Thomlinson didn't specify the origins of this work, Microsoft's heightened encryption efforts follow an October 2013 report that the NSA had been spying on Internet giants in a program called Muscular. The report was based on documents leaked by one-time National Security Agency contractor Edward Snowden.
Microsoft's move also comes just a few weeks after a well-publicized Google webmail report that painted Redmond in less than flattering colors. Google scored Microsoft, along with Comcast and Apple, as webmail providers with inadequate levels of encryption to protect their users' email.
Comcast and Microsoft representatives told CNET at the time of Google's report that their companies were in the process of implementing TLS for their webmail services. Apple did not return a request for comment.
Microsoft also has activated Perfect Forward Secrecy encryption (PFS) for its cloud storage service OneDrive. The OneDrive website, OneDrive mobile apps, and OneDrive syncing tools will now all use the tougher PFS encryption standard, which protects user confidentiality even when an third-party is eavesdropping on the network.
Finally, Microsoft has opened a "transparency center" at its headquarters in Redmond, Wash., where governments can review Microsoft source code for "key products" to confirm that no hidden backdoors have been added to the software. Microsoft has not revealed which of its products will be available for review.
CNET

Friday, June 7, 2013

Any Folder as a Photo Folder

This tricks shows you how to setup any folder to display its contents as a photo folder. In many cases, you save your images/photos in a folder different than "My Pictures" (under "My Documents"). Since this folder you choose is just like any other normal folders, its contents displayed as a listing of files. You can temporary change it by just right-click and select "View" >> "Thumbnails". But if you want to change the folder so that everytime you come back, the folder itself, as well as all its subfolders, display the contents as photo thumbnails.
Here's How
  • Right-click on the folder you choose and select "Properties"

  • Select "Customize" Tab. Then under "Use this folder type as a template", select "Pictures (best for many files)"

  • Check on "Also apply this template to all subfolders" to apply the setting to subfoders as well

  • Click OK to exit
  • Convert any Document or Web Page to PDF

    Convert Any Document or Web Page to PDF

    Somebody just told you that you need to have Adobe Acrobat (Writer) to create a PDF file? Guess what, you can get away from that pricey piece of software if you just need to convert some documents to pdf, without a need of fancy editing the pdf document.
    Here's how. Thanks to the BullZip, who provides a Free Pdf printer. With this free tool, you can simply "print out" your document or webpage to a pdf file, just about the same way as you print it out to a printer.
    You can visit BullZip.com for more information about the software.
    Here the direct link to BullZip downloads page: Downloads
    1. To get started, first follow the link above and download Free Pdf Printer from BullZip, then install it to your computer.
    2. Once you're done, you might need to close the program (or the web browser) which you're currently viewing the document. This helps refreshing the list of available printers on your computer.
    3. Once you get back to the document you want to convert, perform the same steps are you print out the document, i.e. File > Print ...
    4. When you see the Print window pop-up, select "Bullzip PDF Printer" under "Printers", then click "OK".
    5. BullZip PDF Printer will then start to analyze your document and display a new pop-up window, where you can direct it to the location you want to save the pdf file.
    6. Follow the pop-up windows and.. hola! The PDF document is created!

    Wednesday, June 5, 2013

    Top 10 Windows 8 tips and tricks

    Customize your tiles
    Windows 8 tilesMake the most of your Windows Start screen tiles by adjusting the sizes, where they are located, and what is listed.
    • Move any tile by clicking and dragging the tile. While moving a tile, if you need a larger view of the Start screen move the tile towards the top or bottom of the screen to zoom out.
    • Use your mouse wheel to scroll left-to-right through your tiles.
    • Any Desktop shortcut or program can be pinned to the Start screen by right-clicking the icon and choosing Pin to Start.
    • In the bottom right-hand corner of the start screen is a magnifying glass with tiles, click this icon to get a zoomed out view of your Start screen. In this view, if you right-click on a group of tiles you'll be given the option to name group, which can be useful if you have a group of related tiles (e.g. games). In this view, you can also click and drag a group to organize your tile groups.
    • Create a new speed bump between tile groups by moving a tile to a speed bump.
    • Resize any User tile or Live tile by right-clicking the tile and choosing resize.
    • If there is a tile you want on your Taskbar, right-click the tile and choose Pin to taskbar.
    • Show admin applications on the Start screen by clicking Settings in Charms, click Settings, and change the Show administrative tools from No to Yes.
    • In Internet Explorer 10, you can also pin any of your favorite web pages to your Start Screen.
    Windows 8 keyboard shortcuts
    Knowing at least some of the Windows 8 keyboard shortcuts will make your Windows 8 experience much more enjoyable. Try to memorize these top Windows 8 shortcut keys.
    • Press the Windows key to open the Start screen or switch to the Desktop (if open).
    • Press the Windows key + D will open the Windows Desktop.
    • Press the Windows key + . to pin and unpin Windows apps on the side of the screen.
    • Press the Windows key + X to open the power user menu, which gives you access to many of the features most power users would want (e.g. Device Manager and Command Prompt).
    • Press the Windows key + C to open the Charms.
    • Press the Windows key + I to open the Settings, which is the same Settings found in Charms.
    • Press and hold the Windows key + Tab to show open apps.
    • Press the Windows key + Print screen to create a screen shot, which is automatically saved into your My Pictures folder.
    See our Windows shortcuts page for a full listing of all Windows shortcuts.
    Know your hot corners
    The corners on your screen are hot corners and give you access to different Windows features. Below, is a brief explanation of each of these corners.
    Bottom Left-hand corner
    The bottom left-hand hot corner of the screen will allow you to access the Start screen, if you're in the Start screen and have the Desktop open, this corner will open the Desktop from the Start screen.
    Tip: Right-clicking in the left hand corner will open the power user menu.
    Top-left corner of the screen
    Moving the mouse to the top-left corner and then down will display all the apps running on the computer. Clicking and dragging any of these apps to the left or right-hand side of the screen will snap that app to that side of the screen. Each of these open app icons can also be right-clicked to close or snap.
    Right-hand side of the screen
    On the full right-hand side of the screen will be given access to the Windows Charms.
    Taking advantage of search
    The Search in Windows 8 has been significantly improved when compared to all previous versions of Windows. To search for a file or run a program in Windows 8 from the Start screen just start typing what you're trying to find or want to run.
    As you begin typing, the results will start appearing on the left-hand side. In addition to being able to search for files and run programs, the Search also supports limiting the search to apps such as Finance, People, Maps, Photos, Mail, Music, Videos, Weather, and much more. If what you are searching for is not a file or program, click on the app you wish to use as the search. For example, if you were searching for "New York" and selected the Weather App you would be shown the weather in New York, NY.
    By default, Search organizes the available Apps by how frequently they are used and then in alphabetical order. If you want to keep your favorite app at the top of the Search list, right-click the app and choose Pin. Pinning the app will lock it in place regardless of how often it is used. If there is an app you don't want (e.g. Finance) you can turn on and off any of the search apps through the PC settings, which is found under the Settings in the Charms.
    Bonus tip: The Search is also found through Charms and can also be opened by pressing Windows key + F.
    Running two apps side by side
    Any app can be pinned to the left or right-hand side of the screen. For example, open the People app and then press the Windows Key + . (period) to move that app to the right-hand side of the screen, pressing the same keys again will move it to the left-hand side, and pressing the same keys again will make it full screen. While an app is pinned, any other app or program can be opened and loaded into the available space on the screen. For example, in the below picture, we've opened a browser window and have the People app running to monitor our social networks.
    Windows 8 People
    Any open app can also be pinned using your mouse by clicking at the top of the tile and dragging it to the left or right-hand side of the screen.
    Bonus tip: The Desktop can also be pinned to the left or right-hand side of the screen.
    Note: In order for snap to work properly your resolution must be at least 1,366 x 768.
    Windows 8 Task Manager
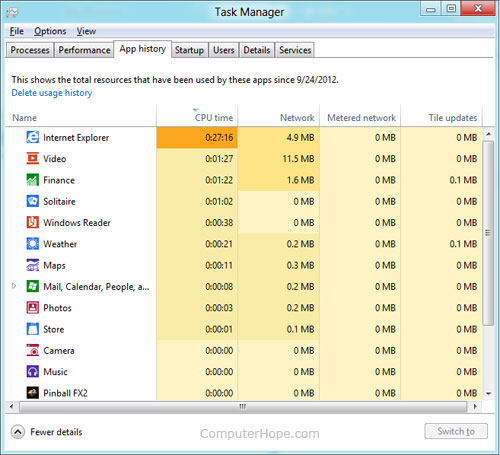
    The Windows 8 Task Manager has been significantly improved over previous versions of Windows. Some of the new changes include showing a total percent usage at the top of your Processes, which makes it easier to determine total memory and CPU usage, improved Performance graphs, a Startup tab to see startup processes and their impact to system performance, and the App history tab (as shown below) that gives you the total resources an app has used over a period of time. Press Ctrl + Shift + Esc to start exploring the new Task Manager.
    Windows 8 Task Manager
    Use a picture password to log into your computer
    Windows 8 includes a new feature called Picture password, which allows you to authenticate with the computer using a series of gestures that include circles, straight lines, and taps. Enable this feature if you want a new way to access your computer or have a hard time with passwords.
    1. Open the Windows Charms.
    2. Click Settings and then More PC settings
    3. In the PC settings window click Users and then select Create a picture password
    Bonus tip: A four digit pin password can also be created and used to access your computer.
    Take advantage of Windows 8 apps
    Windows 8 comes included with several apps to help you get the most from your computer. Below are just a few of the included apps.
    People
    Microsoft touts the People feature in Windows 8 because they understand how many people are using social networks today. In the People feature you'll be able to connect your Windows computer to all the major social networks including FacebookLinkedIn, and Twitter. Once connected, you can pin the people app and monitor your social network (as shown below), use People in Search to find people, and get an overview of what is happening in all your social networks.
    Windows 8 People
    Reader
    The Reader app will give you PDF support right out of the box.
    SkyDrive
    The SkyDrive app will give you access to the Microsoft cloud service SkyDrive, which allows you to store your photos, documents, and other files in the cloud and access or share those files with any computer with Internet access.
    Store
    Take advantage of the Windows Store and install one or more of the thousands of available apps designed for Windows 8. The Store is found in the Start screen, or use Search to search the Store app for any apps that you are trying to find.
    Know the answers to common questions
    Windows 8 is the biggest change to Microsoft Windows since the introduction of Windows 95, which was released all the way back in 1995. Since so many people have grown up with Windows, it can be difficult to transition to a new way of doing things. Below, is a short list of the most common questions previous Windows users will have.
    Know the Jargon
    Knowing all the new jargon introduced with Windows 8 will help improve your familiarity with Windows 8 and make it a more enjoyable experience. Below, are just a few links to the most commonly used Windows 8 terms.
    Source: computerhope.com

    Sunday, June 2, 2013

    Windows 8 – Assign Static IP Address

    So what is a fairly simple task in Windows 7 turns out to take a bit of time in Windows 8. What task might that be? Hmm, maybe changing the IP to a static IP address! Granted, 80% of the extra time it takes to do it in Windows 8 is because of the new Metro UI, which makes it difficult to even get to the Control Panel easily.

    In this article, I’ll walk you through the steps necessary to configure a static IP address in Windows 8. Along the way, I’ll mention a few things about Windows 8 and how you can make it a little less frustrating. For example, it’s nice to just add the Control Panel to your desktop rather than going through the whole Metro UI.

    To get started, let’s go to the Start Screen. You can do that by moving your mouse to the lower left part of the screen (where the start button used to be), opening the charms bar by moving your mouse to the upper right corner of the screen and clicking on Start, or by simply clicking on the Windows key on your keyboard.

    Once on the Start Screen, right-click on a blank space and you’ll see the All Apps icon appear at the bottom.

    Computer tips and tricks as well as software, hardware, internet that help make you more productive and your overall computer experience a lot more enjoyable. Computer tips and tricks, tricks,computer tips, computer, tips, information, listing, tip, computer tip, about, windows, internet, internet, ticks, explorer, Microsoft


    Now you will see Control Panel if you scroll to the right side.

    Computer tips and tricks as well as software, hardware, internet that help make you more productive and your overall computer experience a lot more enjoyable. Computer tips and tricks, tricks,computer tips, computer, tips, information, listing, tip, computer tip, about, windows, internet, internet, ticks, explorer, Microsoft


    Go ahead and right-click on Control Panel and you’ll see it gets checked and a few options appear at the bottom of the screen. Go ahead and click Pin to Start and Pin to Taskbar. You may have to right-click on it again to do both.

    Computer tips and tricks as well as software, hardware, internet that help make you more productive and your overall computer experience a lot more enjoyable. Computer tips and tricks, tricks,computer tips, computer, tips, information, listing, tip, computer tip, about, windows, internet, internet, ticks, explorer, Microsoft


    Now you can open the Control Panel from the Windows 8 desktop or from the Start screen. Open the Control Panel and click on Network and Sharing Center.

    Computer tips and tricks as well as software, hardware, internet that help make you more productive and your overall computer experience a lot more enjoyable. Computer tips and tricks, tricks,computer tips, computer, tips, information, listing, tip, computer tip, about, windows, internet, internet, ticks, explorer, Microsoft


    Now click on Change Adapter Settings in the left-hand pane.

    Computer tips and tricks as well as software, hardware, internet that help make you more productive and your overall computer experience a lot more enjoyable. Computer tips and tricks, tricks,computer tips, computer, tips, information, listing, tip, computer tip, about, windows, internet, internet, ticks, explorer, Microsoft


    Right-click on the network adapter you want to make static and click on Properties.

    Computer tips and tricks as well as software, hardware, internet that help make you more productive and your overall computer experience a lot more enjoyable. Computer tips and tricks, tricks,computer tips, computer, tips, information, listing, tip, computer tip, about, windows, internet, internet, ticks, explorer, Microsoft


    Now click on Internet Protocol Version 4 (TCP/IPv4) and then click on the Properties button.

    Computer tips and tricks as well as software, hardware, internet that help make you more productive and your overall computer experience a lot more enjoyable. Computer tips and tricks, tricks,computer tips, computer, tips, information, listing, tip, computer tip, about, windows, internet, internet, ticks, explorer, Microsoft


    Finally, click on Use the following IP address and type in your static IP address. Whew!! That’s a long process for something so simple.

    Computer tips and tricks as well as software, hardware, internet that help make you more productive and your overall computer experience a lot more enjoyable. Computer tips and tricks, tricks,computer tips, computer, tips, information, listing, tip, computer tip, about, windows, internet, internet, ticks, explorer, Microsoft


    And that’s it! Yes a little long and drawn out, but it’s the same process once you get into the Control Panel. If you have any issues or problems, post a comment and we’ll try to help. Enjoy!


    Windows 8 – Assign Static IP Address


    Reference : http://www.online-tech-tips.com

    Tuesday, May 21, 2013

    How To Move Your Music Files From An iPod To A PC


    If you’ve ever gotten the black, blue, red or any other color “screen of death” on your iPod, you know the frustration that follows. Those John Tesh Acoustical Jams weren’t easy to find and now they’re trapped in limbo with virtually no way to access them. You can try and take the deactivated Pod to an Apple technician but that could be costly and there’s no certainties they can fix the problem or at least save your music.
    If you have the songs saved on your computer, you have options. Unfortunately, many music collections have been acquired over time and from many different locations. This advice will help you convert your music from your iPod to your PC so that John Tesh can withstand an unfortunate iPod crash.

    Move Your Music Files From An iPod To A PC

    The first thing you’ll need to do to transfer music from your iPod to your PC is to show all your hidden files.
    Now that you can view all the files on your computer, plug in your iPod using the USB port. In windows explorer, click on the folder of the drive that is corresponding to your iPod. In this folder, you should see another folder titled “ipod_controls.” In the ipod_controls folder you’ll find files of music. The names will be scrambled something to the like of __Tesh__.. Drag all these files to a folder on your hard drive and they’ll be saved on your PC.
    Just having the files on your hard drive isn’t enough, you’ll need to drag them into iTunes in order to put them on an iPod.
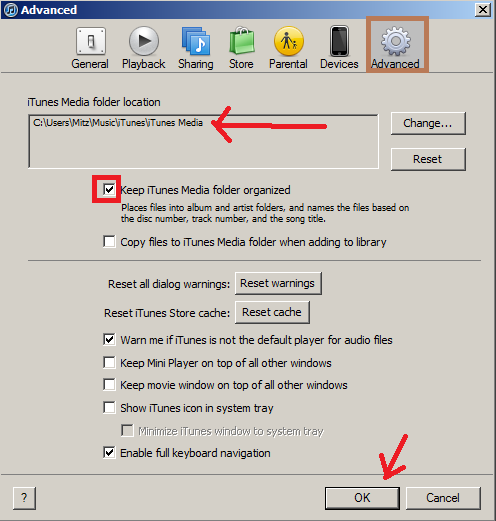
    1. Open iTunes and go to the edit menu and choose preferences from the menu.
    itunes edit menu
    2. Click on the Advanced icon. See the screenshot below.
    4. In the dialog box, select the folder on your hard drive where you dragged the music files. You can do this by clicking on the change button.
    There’s also a box asking to “keep iTunes music organized” and you should make sure that this is checked.
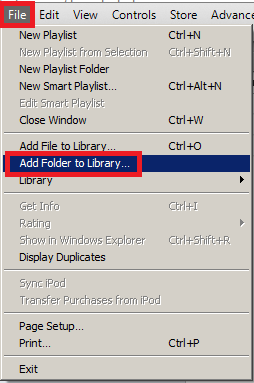
    5. Now in iTunes go to File>Add Folder To Library and select the folder on your hard drive where you transferred the music.
    6. The music will then be transferred to this iPod and the names will conveniently berestored with song titles, album covers, artist name, etc.
    Transferring music from your iPod to your PC is a great way to ensure your music library is never compromised. You can transfer your entire collection to multiple iPods without having to sync them up to different computers. Of course this will take up memory on your PC so it might be a wise idea to purchase a removable flash drive or an external hard drive so that you can free up space as well as take your library on the go. At the very least, transferring your music from the iPod to the PC provides a safe back-up plan to ensure you’re never without Tesh.

    Whether Or Not To Share Your WIFI


    If you’ve ever been out swimming with sharks, and why on earth would you, you’ll notice how quickly the pack of flesh devouring fish circle around the blood that the captain of the tour throws over the boat. Sure, you were probably checking out his bikini-clad daughter a little too long and didn’t heed his warnings during his pre-tour speech but that doesn’t give him the right to speed away in the boat leaving you to fend for yourself. Either way, the site of that Great White’s circling your body is something I deal with everyday in my neighborhood. You see, the person who lives across the street from me has an unsecured wireless network and at all hours of the day there are random cars making the rounds, stopping for a couple minutes to update their Facebook status and to send out tweets before moving on for another lap to stay unnoticed. Besides increased traffic to your cul-de-sac, there are a number of other cons to sharing your wi-fi as well as some benefits.

    Negatives Of Sharing Your Wi-Fi

    If you decide to share your Wi-Fi or not, you should never leave an unsecured network like my friendly neighbor. If you want to let people leech off your Internet, at least set up a user name and give them the password. If random strangers use your Internet to download risqué shark pictures, Tweet that they’re going to bomb the local Arby’s, or upload illegal Ace of Base songs, this activity can be traced to your Wi-Fi. It would be tough to prosecute but why even take the chance?
    Share Your WIFI
    Another reason you should think twice about sharing your Wi-Fi is the usage of bandwidth that might not be available to you. The guy across the hall who always wears camouflage pants might seem like a trusting comrade but if you give him your Wi-Fi password and he plays Call Of Duty online 22-½ hours day you might struggle just to check your email at the end of the month.
    Only share your Wi-Fi with people you trust and to make sure your password isn’t making the rounds like a Kardashian through an NBA roster, change it monthly. Remember that you’ll lose a layer of security when sharing your WIFI so remember to turn off sharing for the files and folders on your computer. Also, load up on anti-virus software before you post your password on the bulletin board in the apartment lobby because even though people will tread lightly in the websites they browse early…they’ll eventually type in ‘nude sharks’ in the Google search bar.

    Positives of Sharing Your WI-FI

    If you live in an apartment complex or there’s a new family moving in across the street on your block, it’s a good neighborly gesture to share your WI-FI until they can get there’s set up. You’ll instantly bond with the newcomers and can help take some stress out of their move. Also, sharing your WI-FI can be a good way to make some money. When people search for networks and find that your signal strength is high, they’ll eventually ask around and trace it back to you. Share your WiFi and make money. Tell them you charge everybody $10 a month to use it and it wouldn’t be fair to give it away for free. Nobody should have problems paying $10 for Internet and if you get enough people to chip in, you could actually get your own Internet for free. Remember that this might violate your ISP contract so I wouldn’t be driving around in a Rolls Royce bragging about your WiFi windfall.

    Setting Up A Guest Account

    When you want to walk the tightrope of being a friendly neighbor but not having your tax records readily available to the public, you can set up a guest account for your WI-FI network. WI-FI guest accounts can be set up through the router or on the router website. Once you find out where your particular router has the administrative information, you can set up a guest account by setting up an additional SSID, or service set identifier. Search for an option that says something along the lines of ‘separate SSID’ and find a 32-character number that identifies your LAN. By clicking on this you can set up a guest account user name and password that will operate separately and securely from the network you use for your daily tasks.

    How To Tell If Somebody Is Stealing Your Wi-Fi

    Even if you take the steps to provide Internet to your deadbeat neighbors, some will try and circumvent your actions and steal your WIFI anyway. This act is called ‘piggybacking’ as they hop on and use the service you pay your hard earned money for. If you’re experience unusually slow Internet, lagging, or you notice a car outside your house that appears to be on a stakeout, there might be a leech on your connection. Through your router you can see a wireless network log which will show you at what times somebody was accessing the WI-FI. Additionally you can install network monitoring software to catch the culprits in the act…just be 100% sure where it’s coming from as you don’t want to compromise an actual stakeout.
    Finally, you can turn off SSID broadcasting so that your network doesn’t appear on any WI-FI network searches. Simply go to your router homepage, then find the SSID section and make sure that the Broadcast SSID is not ticked.
    broadcast ssid

    Still, the best defense is to change your password regularly and to not give it away like Paris Hilton at a movie première.
    In the end, the choice to share your WIFI is totally up to you. I personally don’t share mine, as I don’t want to take the chance of not having Internet at any time of day because 20 of my neighbors are using my connection. If there’s one lesson I’ve always followed, it’s never feed the sharks.

    Thursday, May 16, 2013

    Get Missing Album Art In iTunes Automatically

    One of the disadvantages many of us who had MP3 collections before the trend of iTunes and Amazon MP3 is that many of the files lack album art. It’s annoying to browse through CoverFlow and see half your library with pretty pictures and the other half with a generic Icon. Here’s a step-by-step guide to make iTunes search for album art for you.

    iTunes Album Art
    Find Missing Album Art Automatically in iTunes


    1. If you haven’t already, download and install iTunes from Apple’s site.

    2. During the initial set up, iTunes will encourage you to create an account. While you don’t have to make an account to use the application, you do need an account to search for album art. Creating an account is easy, free and only requires an active email address.

    3. Wait for the initial set up to finish and import your music library. While this happens, ensure that you are logged in by clicking on the “Store” tab and seeing if it asks you to log in. If so, then you’ll need to enter your email and password. If not, you’re already logged in and can move on to the next step.

    4. Once all of your music library has been entered into iTunes, click on the Music tab.

    5. On the information directory, at the top of the application, click the tab that says “Advanced”

    6. In the “Advanced” dialog box, click “Get Album Art Work”

    7. The status bar will change to “Getting Album Artwork”. This may take a while depending on the size of your library.

    8. After a little while, the status should change to “Downloading Album Artwork” . This again may take a while depending on your music library.

    9. Change your view to “Cover Flow” and you will see all or most of the albums missing art work now have some.

    This tutorial will work on devices running Windows and/ or Macintosh.