Showing posts with label other device. Show all posts

Thursday, July 3, 2014

Microsoft, Canon shake on patent licensing agreement

The two companies will share intellectual property on a "broad range of products and services," including those for certain digital imaging and mobile consumer products.
Here's a novel idea: Instead of suing for patent infringement, why not just share the intellectual property?
This is exactly what Microsoft and Canon have decided to do. The two companies announced Wednesday that they've signed a patent cross-licensing agreement, which gives them the right to use the intellectual property on some of each other's products.
"This collaborative approach with Canon allows us to deliver inventive technologies that benefit consumers around the world," Microsoft IP Licensing general manager Nick Psyhogeos said in astatement. "Microsoft believes cooperative licensing is an effective way to accelerate innovation while reducing patent disputes."
Patent cross-licensing agreements are nothing new. In fact, a lot of tech companies over the years have made such deals with their colleagues and even their competitors. For example, earlier this year Samsung entered into three separate patent cross-licensing agreements with GoogleCisco Systems, and Ericsson.Microsoft and Canon did not disclose the terms of the deal or say exactly what types of patents they'll be sharing. But, they did say the agreement "covers a broad range of products and services" and applied to their "growing patent portfolios." The companies said that certain digital imaging and mobile consumer products have been included in the agreement.
As for Microsoft, since it launched its IP licensing program in 2003, it has entered into more than 1,100 licensing agreements with various companies.

'Reading Rainbow' brings in $5M, eclipses Kickstarter record for most backers

The "Reading Rainbow" Kickstarter campaign attracted the most backers in the crowdfunding site's history.
Riding a massive wave of nostalgia, actor LeVar Burton's Reading Rainbow campaign ended on Wednesday, with the distinction of being the most widely-backed campaign in the crowdfunding site Kickstarter's 5-year history.
The campaign attracted more than 105,000 backers. It is also Kickstarter's fifth most successful campaign ever, raising more than $5.4 million, five times the original goal of $1 million.
The project sought to bring "Reading Rainbow," a popular children's PBS series that championed reading and ran from 1983 to 2006, to the Web and into classrooms around the world. Burton, who hosted the show throughout its entire run, bought the name and rights to the series after it ended and, in 2012, launched a free interactive "Reading Rainbow" tablet app.
RRKidz, Burton's media company, did not return a request for comment.In order to reach a wider audience of children, the campaign called for the app to be available on the Web. As the "Reading Rainbow" campaign raised money, it promised integrations on more screens: game consoles like Xbox and PlayStation, set-top boxes and streaming devices like Apple TV and Roku, and mobile devices running Apple's iOS and Google's Android operating systems. The "Reading Rainbow" program also will be available in some 7,500 classrooms for free.
To spur last-minute pledges, Seth McFarlane, creator of the cartoon "Family Guy," last week said he would match up to $1 million in pledges over the $4 million mark.
Kickstarter is the platform responsible for funding tech startups like smartwatch maker Pebble and Oculus, the virtual reality headset maker now owned by Facebook. It also has become a destination for high-profile media projects, like funding for actor-director Zach Braff's flick "Wish I was Here," or the"Veronica Mars" movie. The latter held the previous record for most backers, with 91,585 people donating. Kickstarter was not available for comment.
The "Reading Rainbow" campaign went viral after getting media attention in May, and achieved its original goal in less than one day. Backers received special prizes based on how much they donated, including a private dinner with Burton, or a picture with Burton while the backer wears his iconic Geordi La Forge visor, a throwback to Burton's role on "Star Trek: The Next Generation."
"It's unbelievable," said a teary-eyed Burton, on the first day of the campaign, after donations crossed the $1 million threshold. Then he paused. "It's actually very believable."
CNET

Friday, June 7, 2013

Any Folder as a Photo Folder

This tricks shows you how to setup any folder to display its contents as a photo folder. In many cases, you save your images/photos in a folder different than "My Pictures" (under "My Documents"). Since this folder you choose is just like any other normal folders, its contents displayed as a listing of files. You can temporary change it by just right-click and select "View" >> "Thumbnails". But if you want to change the folder so that everytime you come back, the folder itself, as well as all its subfolders, display the contents as photo thumbnails.
Here's How
  • Right-click on the folder you choose and select "Properties"

  • Select "Customize" Tab. Then under "Use this folder type as a template", select "Pictures (best for many files)"

  • Check on "Also apply this template to all subfolders" to apply the setting to subfoders as well

  • Click OK to exit
  • Create Ghost Bootable SD Card or USB Flash Drive

    Create Ghost Bootable SD Card or USB Flash Drive

    It's a good practice to create an image of your hard drive before you start using it. Especially when you had to build that computer from scratch and spent hours installing the operating system and all of your favorite apps...

    As Symantec Ghost becomes more user friendly, people start to recognize this idea. The idea also works well when you need to clean your PC from viruses. In case anything goes wrong with the operating system, you just need to restore the image using the Symantec bootable CD.

    However, the problem comes when we deal with the new version of those small laptops: The netbooks! which usually don't come with a built-in CD-ROM drive to bootup the PC.
    The most simple solution would be buying an external CD-ROM drive, which costs you money. And in some cases, you just want to bootup the Symantec Ghost.... with whatever available!


    The good news: Almost every recent laptop/netbook comes with a card reader, and even if you wasn't lucky enough, your laptop/netbook should have a USB port!

    This guide will tell you how to create a bootable SD card or a USB flash drive with Symantec Norton Ghost.
    This task can be done with several different versions of Symantec Ghost; however, the steps from this articles are based on Symantec Ghost 14.


    What you need?
    • Symantec Ghost 14 bootable CD. (Some other versions might also work)
    • A PC with bootable CD/DVD drive.
    • An SD card (either SD or SDHC), or a USB thumb drive. The size can be as minimum as 1 GB. You can also pick a large SD card if you want to store your hard drive image to the card as well.
    • An SD slot or a card reader (for SD card) or a USB slot (for thumb drive)

    Follow the steps in order. Use this guide at your own risks.

    1. First, check to make sure your CD/DVD drive is bootable. (See your BIOS manual or PC user guide for details since this is out of the scope of this article).
    2. - For SD card: Make sure the SD slot or the card reader is available. if it's a card reader, connect it to the PC. Also insert the card.
      - For USB thumb drive: Make sure the drive is inserted into one of the USB slots.
    3. Bootup the computer using the Symantec Ghost CD (Details vary on different computers). On Windows XP, during the startup, you should see the prompt "Press any key to boot from CD...".
    4. Once the Symantec Recovery startup is complete, you should see the main screen of Symantec Ghost 14 Recovery similar to this image:


    5. Select "Analyze" from the left menu.

    6. Then click on "Open Command Shell Window". A command prompt window will display.
    7. At this command prompt window, type: "diskpart" (one word, without quotes) and hit enter. The prompt now changed to "DISKPART>"
    8. Now type "list disk" and hit enter. You should now see a list of all available disks. Base on the size of each disk listed, find the one that matching your SD card (or thumb drive) and note its disk number under "Disk ###". If you don't see your SD card (or flash drive) listed, verify if it is inserted or plugged in (you might need to restart the computer and try again).
    9. Type "select disk " (replace with the disk # noted from the previous step) then hit enter.
      Important!! Besure to select the correct disk (your SD card or thumb drive) as you will be erasing the drive.
      Sample image with a 4-GB SD selected:


    10. Create a primary partition for the the disk by executing the following sequence of commands:
      clean
      create partition primary
      select partition 1
    11. Set the primary partition active, type: "active" and hit enter
    12. Perform a quick format with the following command:
      format fs=fat32 quick
    13. Then type:
      assign
      exit
    14. Your SD card (or the flash drive) is now bootable and will act similar to a local hard drive. In order to boot this card with Symantect Ghost Recovery, copy all contents from the Symantec Ghost disc to the SD card (or the flash drive). Besure to copy everything including any hidden files/folders.

      The SD card or flash drive is now bootable and will boot your laptop/netbook to Symantec Ghost Recovery utilities exactly the same way as of the CD (To boot with the card on your laptop/netbook, don't forget to set your bios to search for the SD card or USB external devices in the boot sequence).

    Tuesday, May 21, 2013

    How To Move Your Music Files From An iPod To A PC


    If you’ve ever gotten the black, blue, red or any other color “screen of death” on your iPod, you know the frustration that follows. Those John Tesh Acoustical Jams weren’t easy to find and now they’re trapped in limbo with virtually no way to access them. You can try and take the deactivated Pod to an Apple technician but that could be costly and there’s no certainties they can fix the problem or at least save your music.
    If you have the songs saved on your computer, you have options. Unfortunately, many music collections have been acquired over time and from many different locations. This advice will help you convert your music from your iPod to your PC so that John Tesh can withstand an unfortunate iPod crash.

    Move Your Music Files From An iPod To A PC

    The first thing you’ll need to do to transfer music from your iPod to your PC is to show all your hidden files.
    Now that you can view all the files on your computer, plug in your iPod using the USB port. In windows explorer, click on the folder of the drive that is corresponding to your iPod. In this folder, you should see another folder titled “ipod_controls.” In the ipod_controls folder you’ll find files of music. The names will be scrambled something to the like of __Tesh__.. Drag all these files to a folder on your hard drive and they’ll be saved on your PC.
    Just having the files on your hard drive isn’t enough, you’ll need to drag them into iTunes in order to put them on an iPod.
    1. Open iTunes and go to the edit menu and choose preferences from the menu.
    itunes edit menu
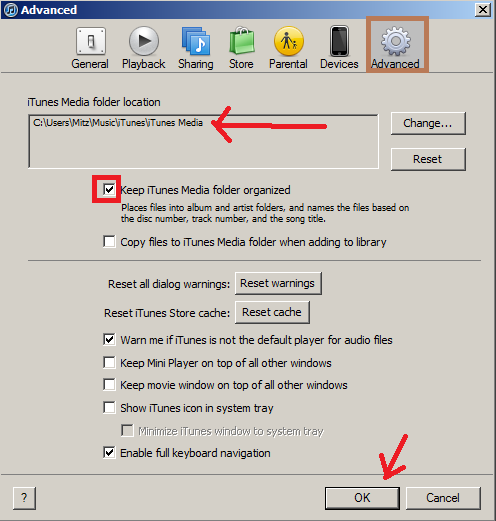
    2. Click on the Advanced icon. See the screenshot below.
    4. In the dialog box, select the folder on your hard drive where you dragged the music files. You can do this by clicking on the change button.
    There’s also a box asking to “keep iTunes music organized” and you should make sure that this is checked.
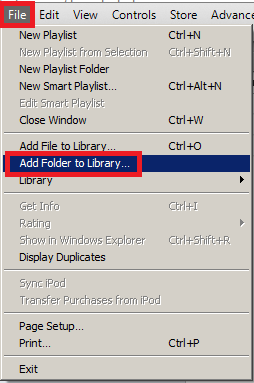
    5. Now in iTunes go to File>Add Folder To Library and select the folder on your hard drive where you transferred the music.
    6. The music will then be transferred to this iPod and the names will conveniently berestored with song titles, album covers, artist name, etc.
    Transferring music from your iPod to your PC is a great way to ensure your music library is never compromised. You can transfer your entire collection to multiple iPods without having to sync them up to different computers. Of course this will take up memory on your PC so it might be a wise idea to purchase a removable flash drive or an external hard drive so that you can free up space as well as take your library on the go. At the very least, transferring your music from the iPod to the PC provides a safe back-up plan to ensure you’re never without Tesh.

    Install Window 7 through USB or PENDRIVE


    Now to make this bootable USB memory stick (Window 7 install) you will need at least one Windows 7 DVD 32bit or 64bit depending on what version you want to install and a blank 4gb USB or PENDRIVE.
    1. Insert the Windows 7 DVD into your computer and the USB or PENDRIVE into your computer.
    2. Open an “Command Prompt” and run “DISKPART”.
    This will open a diskpart in separate  window.
    Open disk part to install window 7 through USB


    3. Type “LIST DISK” and take note what the disk number is of the USB or PENDRIVE. Check the SIZE column to know about your pendrive.
    4. Then type “SELECT DISK Y” where Y is the disk number of the USB.
    5. Type “CLEAN” ( This will clear all data from the USB or pendrive).
    6. Type “CREATE PARTITION PRIMARY”.
    7. Type “SELECT PARTITION 1”.
    8. Type “ACTIVE”
    9. Type “FORMAT FS=FAT32” and wait for 10 minutes or more depending upon the size of pendrive or usb.
    diskpart commands
    10. Type “ASSIGN”.
    11. The auto play window will now appears. Take note of the drive letter (e.g. G:\ ) and close this window.
    12. Type “EXIT”.
    13. At the command prompt type “xcopy E:*.* /s/e/f G:” where E is the drive letter of you DVD and G is the drive letter of your USB.
    14. Now wait until it copy boot.wim and install.wim on to USB or PENDRIVE.
    15. When xcopy is finished run “del G:\sources\ei.cfg” from the command prompt and your Windows 7 Bootable USB or PENDRIVE is ready for use. You can now either boot from the USB or just run setup.exe from the drive to start the install process.

    This is how one can install window 7 through usb or pendrive.

    Thursday, May 16, 2013

    Get Missing Album Art In iTunes Automatically

    One of the disadvantages many of us who had MP3 collections before the trend of iTunes and Amazon MP3 is that many of the files lack album art. It’s annoying to browse through CoverFlow and see half your library with pretty pictures and the other half with a generic Icon. Here’s a step-by-step guide to make iTunes search for album art for you.

    iTunes Album Art
    Find Missing Album Art Automatically in iTunes


    1. If you haven’t already, download and install iTunes from Apple’s site.

    2. During the initial set up, iTunes will encourage you to create an account. While you don’t have to make an account to use the application, you do need an account to search for album art. Creating an account is easy, free and only requires an active email address.

    3. Wait for the initial set up to finish and import your music library. While this happens, ensure that you are logged in by clicking on the “Store” tab and seeing if it asks you to log in. If so, then you’ll need to enter your email and password. If not, you’re already logged in and can move on to the next step.

    4. Once all of your music library has been entered into iTunes, click on the Music tab.

    5. On the information directory, at the top of the application, click the tab that says “Advanced”

    6. In the “Advanced” dialog box, click “Get Album Art Work”

    7. The status bar will change to “Getting Album Artwork”. This may take a while depending on the size of your library.

    8. After a little while, the status should change to “Downloading Album Artwork” . This again may take a while depending on your music library.

    9. Change your view to “Cover Flow” and you will see all or most of the albums missing art work now have some.

    This tutorial will work on devices running Windows and/ or Macintosh.

    Monday, April 15, 2013

    Intel releases Web-based app programming kit


    The chipmaker is jumping on the HTML5 bandwagon -- sort of. Its newly acquired AppMobi software lets programmers create Web apps that can be converted into native Android and iOS apps.
    Intel XDK software
    Intel's XDK software, which the chipmaker got through its acquisition of AppMobi, is now available under the Intel name. It lets people use Web-app tools to create software that runs on mobile devices.
    (Credit: Intel)
    Intel has released its first version of Web-based programming tools to help developers make mobile apps for Android and iOS.
    The free software, called Intel XDK, isn't brand new. It's a rebadged version of the AppMobi software that Intel acquired in February. XDK lets people create software that uses the so-called HTML5 foundation, a collection of standards designed to advance the Web beyond static documents toward dynamic applications, then convert those apps so they can be used on mobile devices.

    Intel announced the XDK release at its Intel Developer Forum show in Beijing this week. The software is free, but uses and requires people to use Google's Chrome browser.
    It may sound peculiar for Intel to give away programming tools, but it's got a long history of trying to help programmers write the software that ultimately will mean Intel processors will have something to do. The AppMobi technology brings a cross-platform approach to the chore so programmers can reach a broader market.
    Historically, Intel developer tools have been lower-level offerings designed for programming software that runs natively on chips, but the cross-platform XDK employs the abstraction of the Web. That means, at least in principle, that software runs on any type of chip as long as there's a browser engine to execute the code.
    Why might Intel be interested in fostering software that runs on any old chip, not just its own x86 models? One reason: in the mobile realm, ARM chips rule and Intel is the challenger. Writing Web apps means software runs on anyone's chips, not just on ARM chips.
    Updated at 8:20 a.m. PT to fix the name of the software.

    YouTube lets you relive the old-school look of VHS -- in HD


    YouTube lets you relive the oldschool look of VHS  in HD
    Sure, watching YouTube videos in HD is great when you want clarity, but maybe you've been yearning for that grainy, tape-recorded look. Marking what's apparently the 57th anniversary of cassette-based video recording, the YouTube team has snuck a VHS tape-shaped button on select videos. Clicking it will the throw a filter over the content, providing a highly distorted and nostalgic feast for the eyes. There's no official list of compatible content, but the option seems to be available on most of the videos on YouTube's native channel. We have a feeling at least one VCR enthusiast will be quite pleased.

    Friday, April 12, 2013

    My Alarm Is iRinging

    The latest reports about an iTV better be a bad joke, or else it could all end up being a good skit on late night comedy shows. That's because of the focus on an iRing remote control, something that could end up lost inside a couch -- if not eaten by the family dog. A smaller, iPad-like screen bundled with a 60-inch iTV, however, could fly since it builds on the idea of extending the television experience -- a potentially good idea for Apple. Let's get this straight right now: Using an "iRing'" to control an Apple iTV is dumb. Mind-numbingly dumb. However, there's a seemingly realistic rumor about it, stemming from analyst Brian White at Topeka Capital Markets who apparently learned of the potential motion-based controller after a tour of Apple's supply chain in China.
    It's bad enough that your non-Apple enthusiast friends laugh at you when you say they can take their iPhone or iPad into an Apple Store and have a "Genius" look at it. Imagine them watching you use your One Ring of Power to change channels or crank up the volume.
    Now imagine guys half-baked on their living room couches in Washington and Colorado -- where marijuana use has been decriminalized -- using the iRing.
    Apple products are supposed to be cool, with designs that make you want to touch them, hold them, and use them. An iRing is the opposite of cool. I bet the writers at SNL have already written up a half-dozen skits on it already, which probably include jokes about utility belts and holsters for smartphones.
    Aside from the idiotic geekiness of an iRing, the practical issues for most of America make it hard for me to imagine anyone at Apple thinking it was a good idea. Which remote in my household is the most irritating remote? The svelte aluminum Apple TV remote. Why? It's forever getting lost. It's so small it slips into all sorts of couch cushions, hides underneath pillows, magazines, and generally blends into its environment.
    My Dish Network remote, on the other hand, is a big monstrosity that rarely gets lost, and everyone knows how to use it.
    While an iRing is unlikely to get lost while on my finger, how do you share it? Does everyone in your entire household have to have one? How about visiting grandparents? The iRing should come with a kit that includes a magnet and a pair of scissors for locating and extracting the iRing from inside the bowels of your couch.
    I could go on railing against an iRing, but it's not worth it. I can barely bring myself to imagine that such a product would actually ever leave the prototype stage in Jony Ive's secret design lair in Cupertino. I just hope that the iRing is part of an elaborate sting operation set up by Apple to catch corporate leakers.
    ;Ring By Any Other Name Of course, the "ring" idea doesn't have to be literal. A method for controlling your iTV HDTV could be based on a metaphorical ring, or even a virtual circle (or button) navigation method. It could even be a code name for one remote that rules them all.
    It's possible that if an iWatch ever comes to fruition, it could be used to control -- or even extend -- an iTV, along with iPods, iPads and iPhones. I'm ok with that. While an iWatch could become cool or stupid, it's far more likely to be useful.
    Still, Brian White seems to have sparked another rumor that actually makes sense: An iTV would ship as a 60-inch HDTV screen, but it could come bundled with a "mini iTV" -- a small, portable screen that could display television content. It could be similar to an iPad without all the cost and brains built into it. I like this idea. A lot. Why? It makes sense!
    For March Madness, upcoming NBA playoffs, the Super Bowl, breaking news and so on, I've often wanted to be able to have a portable second screen. I could take it into the garage or the kitchen. There are ways to do this now using iPads and iPhones, but they require additional hardware and services. Apple could make it all easy and seamless.
    What's far more interesting than an iRing or an iWatch controlling your iTV is the idea that any Apple device could control it. What would stop Apple from letting an iPhone become a gesture-based controller? You wouldn't have to have an iWatch. You wouldn't have to look at the iPhone and tap and swipe to navigate an iTV screen, but you could.

    Maybe Navigation Isn't the Critical Factor

    Thanks to the Steve Jobs quote from his official biography that says he "cracked" the user interface, I think all of us Apple watchers get hung up on the navigation problem.
    I'm starting to think (and hope) that perhaps an iTV will truly extend itself beyond the living room. A 60-inch HDTV with a pretty interface will be nice, no doubt, but that's still just an incremental improvement upon a very common form factor.
    To take the world by storm, I hope Apple is thinking about turning the iTV into a true household hub