Showing posts with label Computer-tricks. Show all posts

Tuesday, July 8, 2014

Share a hard drive with everyone on your Wi-Fi network

Take advantage of your router's USB port with a little trick that lets you share a hard drive with anyone on your Wi-Fi network.
Cloud storage is expensive, but it's not the only way to share a bunch of files across many devices. Instead, you can use an external hard drive and your router to create networked storage accessible to anyone on your Wi-Fi network.
When it's set up, any files stored on that drive can be accessed by all devices on your network -- even phones and tablets. Here's how to set it up on Windows.

Step 1: Choose your drive

The drive you share can be as small as thumb drive, or as large as a 3TB external hard drive. Check your router's manual to find out if there are any storage limitations, since some routers have a storage cap.
Once you've chosen your drive, plug it in.

Step 2: Enable USB drive sharing

On any computer connected to your Wi-Fi network, launch a browser, and navigate to your router's IP address. You can find this on the back of the router, in the device manual, or by searching for it online. In most cases, it looks like 192.168.X.X.
When the page loads, you'll be asked to log in with your username and password. If you changed it, you should know it. If you didn't, it's probably still admin (username), and admin (password).
Those who fall into the latter category, please change your password as soon as you can, and before proceeding to the next step.
Every router's interface is different, but if yours has a USB port, you'll find a link entitled something likeFile Sharing under the Administrator settings. In this window, enable the file sharing server (also called SAMBA). Apply the settings, and exit.
enablefilesharing.jpg
Screenshot/Sharon Profis

Step 3: Access the drive

You're now ready to read and write to your attached hard drive. Open a file explorer window, and navigate to the Network folder in the left sidebar. Then, clear out the path at the top of the explorer window, and enter \\[your IP address]. So, for example, it might look like: \\192.168.1.1
networkfolder.jpg
Screenshot/Sharon Profis
With that, your drive will appear. Open it to access its contents, just like any other folder. If you're asked to log in, simply use your router's login credentials (the same one used to log into the Web interface.)
If you plan on leaving your hard drive attached, so that you can easily access it from any Explorer window. To do that, right-click the drive and select "Map network drive..." Give it a name, and the folder will appear in the sidebar.
mapdrive.jpg
Screenshot/Sharon Profis
To access the drive on other computers on the network, repeat step 3.

PC market won't stink as much this year, says Gartner

Worldside shipments of PCs will still drop in 2014 but not as badly as they did last year. And ultramobiles will provide a bit of a boost.
The PC market will stage a small revival this year, according to Gartner.
Peering into its crystal ball, the research firm said Monday that global PC shipments will decline by only 2.9 percent in 2014. That may not sound like a huge cause for celebration. But the outlook is better than last year's drop of 9.5 percent. Gartner's PC figures include desktops, notebooks, and premium "ultramobile" devices.
The PC market has been on a downward spiral for the past few years as more consumers have opted for smartphones and tablets over traditional desktops and laptops. Many people have also been hanging onto their PCs longer rather than refreshing them every couple of years. And the lackluster appeal of Windows 8 failed to give consumers much of a reason to rush out and buy a new computer. So why will 2014 be kinder and gentler to the PC industry? Thank the business community.
"Business upgrades from Windows XP and the general business replacement cycle will lessen the downward trend, especially in Western Europe," Gartner research director Ranjit Atwal said in a statement. "This year, we anticipate nearly 60 million professional PC replacements in mature markets."
gartner-pc-market-forecast.jpg
Gartner
Shipments of traditional desktops and laptops will drop from 296.1 million last year to 276.2 million this year and to 261.6 million next year. But ultramobiles will grab more customers, according to Gartner, with shipments rising from 21.5 million in 2013 to 32.2 million in 2014 and 55 million in 2015. An ultramobile, or ultrabook, is defined as a thin, compact, lightweight laptop designed to be used on the go. Apple's MacBook Air is one example.
Tablet shipments, meanwhile, will rise by 24 percent to reach 256 million units. Mobile phone shipments are projected to hit 1.9 billion units this year, up 3.1 percent from 2013. Smartphones will continue to eat up more of the market, as Gartner expects them to account for 66 percent of all global mobile phone shipments this year, rising to 88 percent by 2018.

Thursday, July 3, 2014

Lenovo: IBM, Motorola deals to close by 2015

Chinese tech giant's CEO says regulatory review is "progressing" over the purchase of IBM's low-end server unit and Google's Motorola Mobility unit.
Lenovo expects the acquisition of both IBM's low-end server business and Google's Motorola Mobility unit to be wrapped up by year's end.
Yang Yuanqing, CEO of the China-based tech giant, said Wednesday that both deals are undergoing regulatory review in China and the United States, but are "progressing," according toReuters.
At Lenovo's annual meeting in Hong Kong, the chief executive said, "We hope to complete the two deals by year-end. The US government...and US Army are...our clients. There has been no issue and we will keep this tradition."
Last week, The Wall Street Journal reported that Lenovo's plans to purchase IBM's server business were potentially facing delays due to security worries. US security officials and members of the Committee on Foreign Investment in the United States were scrutinizing whether Lenovo's bid to buy IBM's servers -- which support Pentagon systems -- could eventually prove to be a chink in the armor of national security if Lenovo maintained them. Sources said that "Chinese spies" may be able to use this link to compromise the Pentagon.
While Yang refused to comment on the report, the executive rejected the idea that Lenovo products were a threat to security. "If you look at our history, with domestic and overseas clients, there have never been any issues regarding security," he said.
This is not the first time Lenovo has fought off security-based scrutiny. When Lenovo purchased IBM's PC business in 2005, Lenovo PCs sent to the military were found to host "connections to China" that were unauthorized. This, in turn, led to a number of US governmental bodies declining to use the firm's technology. The $2.3 billion sale of IBM's x86 server business was announced in January, and the sale of Google's handset business was also revealed in the same month, valued at $2.9 billion.
CNET

Share a hard drive with everyone on your Wi-Fi network

Take advantage of your router's USB port with a little trick that lets you share a hard drive with anyone on your Wi-Fi network.
Cloud storage is expensive, but it's not the only way to share a bunch of files across many devices. Instead, you can use an external hard drive and your router to create networked storage accessible to anyone on your Wi-Fi network.
When it's set up, any files stored on that drive can be accessed by all devices on your network -- even phones and tablets. Here's how to set it up on Windows.

Step 1: Choose your drive

The drive you share can be as small as thumb drive, or as large as a 3TB external hard drive. Check your router's manual to find out if there are any storage limitations, since some routers have a storage cap.
Once you've chosen your drive, plug it in.

Step 2: Enable USB drive sharing

On any computer connected to your Wi-Fi network, launch a browser, and navigate to your router's IP address. You can find this on the back of the router, in the device manual, or by searching for it online. In most cases, it looks like 192.168.X.X.
When the page loads, you'll be asked to log in with your username and password. If you changed it, you should know it. If you didn't, it's probably still admin (username), and admin (password).
Those who fall into the latter category, please change your password as soon as humanly possible, and before proceeding to the next step.
Every router's interface is different, but if yours has a USB port, you'll find a link entitled something likeFile Sharing under the Administrator settings. In this window, enable the file sharing server (also called SAMBA). Apply the settings, and exit.
enablefilesharing.jpg

Step 3: Access the drive

You're now ready to read and write to your attached hard drive. Open a file explorer window, and navigate to the Network folder in the left sidebar. Then, clear out the path at the top of the explorer window, and enter \\[your IP address]]. So, for example, it might look like: \\192.168.1.1
networkfolder.jpg
With that, your drive will appear. Open it to access its contents, just like any other folder. If you're asked to log in, simply use your router's login credentials (the same one used to log into the Web interface.)
If you plan on leaving your hard drive attached, so that you can easily access it from any Explorer window. To do that, right-click the drive and select "Map network drive..." Give it a name, and the folder will appear in the sidebar.
mapdrive.jpg
To access the drive on other computers on the network, repeat step 3.
Source: CNET

Saturday, October 26, 2013

Awesome Tool to Improve Your Website Speed

Recently I started trying to optimize the loading speed of my websites, after the number of people using mobile devices and 3G or similar connections is exploding, and those connections are not the fastest.
One of the best tools I came across for this purpose is calledGTMetrix.com. You just need to input your website URL and it will run a very comprehensive speed test.
website-speed-tool
Once the test is complete you’ll get a grade and recommendations from both Google’s Page Speed and Yahoo’s YSlow plugins. Going through both list of recommendations will certainly give you many pointers to start working on.
Check it out!

Tuesday, September 24, 2013

Are You Making a HUGE Mistake With Your RSS Icon

If you’ve been around the blogosphere for a few years, you probably know how important it is to get people to subscribe to your blog, so they don’t miss out.
Chances are, right at the top of your sidebar, you have a big, probably orange, button that looks something like this:
rss-mistake
Image from Flickr by TEIA MG.
Back when I started blogging in 2008, RSS was crucial and bloggers often linked to their RSS feed in the bio of their guest posts.
Today, though, things are very different. Many blog readers get updates by email, not by RSS. And if you’re not making your get-posts-by-email optionreally clear, you’re missing out on subscribers.

Most People Don’t Use RSS

This Business Insider title says it all, really: The Truth About RSS: It’s Not “Dying” – Normal People Never Used It In The First Place (And that’s from 2011! With Google Reader being discontinued in 2013, it’s clear that RSS isn’t exactly growing in popularity.)
I use RSS … but I’m willing to admit I’m a bit of a geek! Unless you’re blogging in a very techy niche, it’s likely that most of your readers will follow your posts by email, not by RSS. And in case you’re not sure, think about this:

The Big Blogs Are Promoting Email

copyblogger-email-subscriptions-screenshotThis screenshot shows the top of Copyblogger’s sidebar. Note how large and prominent the email sign up is (compare it to the search box below) – and how small the “Subscribe RSS” link is.
More and more blogs doing something similar, making it as easy and quick as possible for readers to sign up for posts by email. If you’re worrying that this will put off people who subscribe by RSS, you can relax. Here’s why:

Those Who DO Use RSS Can Easily Get Your Feed

If you’re an RSS fan, how do you add blogs to your feed reader? Personally, I just put in the URL. Feedly finds the feed, and I subscribe. It’s years since I’ve clicked on an RSS button or link on a blog – there’s just no need to do it nowadays.
If you have readers using RSS, they know what they’re doing. They won’t have any problems finding your feed.

What You Need to Do

1. Make sure you have email subscriptions enabled. This is absolutely crucial … but some bloggers are struggling on with RSS alone, wondering why they’re hardly getting any new subscribers. (If you’re using Feedburner, there are instructions for enabling email here.)
2. Make your email subscription option prominent. That almost certainly means giving it pride of place at the top of your right-hand sidebar – this is where blog-savvy readers will look first. You might also put an email subscription box at the end of (some or all) of your posts.
3. Check how your emails look. Subscribe to your own blog by email, if you’ve not done so already. Are any elements of your posts not displaying? Of course, you won’t have full control over how things look … but you can at least prompt readers to “click here to watch the video if you can’t view it in your inbox” or similar.
Are you still using RSS? What about your readers – how many are subscribed by email versus RSS? Let us know in the comments! 
Source: dailyblogtips.com

Friday, June 7, 2013

Any Folder as a Photo Folder

This tricks shows you how to setup any folder to display its contents as a photo folder. In many cases, you save your images/photos in a folder different than "My Pictures" (under "My Documents"). Since this folder you choose is just like any other normal folders, its contents displayed as a listing of files. You can temporary change it by just right-click and select "View" >> "Thumbnails". But if you want to change the folder so that everytime you come back, the folder itself, as well as all its subfolders, display the contents as photo thumbnails.
Here's How
  • Right-click on the folder you choose and select "Properties"

  • Select "Customize" Tab. Then under "Use this folder type as a template", select "Pictures (best for many files)"

  • Check on "Also apply this template to all subfolders" to apply the setting to subfoders as well

  • Click OK to exit
  • Create Ghost Bootable SD Card or USB Flash Drive

    Create Ghost Bootable SD Card or USB Flash Drive

    It's a good practice to create an image of your hard drive before you start using it. Especially when you had to build that computer from scratch and spent hours installing the operating system and all of your favorite apps...

    As Symantec Ghost becomes more user friendly, people start to recognize this idea. The idea also works well when you need to clean your PC from viruses. In case anything goes wrong with the operating system, you just need to restore the image using the Symantec bootable CD.

    However, the problem comes when we deal with the new version of those small laptops: The netbooks! which usually don't come with a built-in CD-ROM drive to bootup the PC.
    The most simple solution would be buying an external CD-ROM drive, which costs you money. And in some cases, you just want to bootup the Symantec Ghost.... with whatever available!


    The good news: Almost every recent laptop/netbook comes with a card reader, and even if you wasn't lucky enough, your laptop/netbook should have a USB port!

    This guide will tell you how to create a bootable SD card or a USB flash drive with Symantec Norton Ghost.
    This task can be done with several different versions of Symantec Ghost; however, the steps from this articles are based on Symantec Ghost 14.


    What you need?
    • Symantec Ghost 14 bootable CD. (Some other versions might also work)
    • A PC with bootable CD/DVD drive.
    • An SD card (either SD or SDHC), or a USB thumb drive. The size can be as minimum as 1 GB. You can also pick a large SD card if you want to store your hard drive image to the card as well.
    • An SD slot or a card reader (for SD card) or a USB slot (for thumb drive)

    Follow the steps in order. Use this guide at your own risks.

    1. First, check to make sure your CD/DVD drive is bootable. (See your BIOS manual or PC user guide for details since this is out of the scope of this article).
    2. - For SD card: Make sure the SD slot or the card reader is available. if it's a card reader, connect it to the PC. Also insert the card.
      - For USB thumb drive: Make sure the drive is inserted into one of the USB slots.
    3. Bootup the computer using the Symantec Ghost CD (Details vary on different computers). On Windows XP, during the startup, you should see the prompt "Press any key to boot from CD...".
    4. Once the Symantec Recovery startup is complete, you should see the main screen of Symantec Ghost 14 Recovery similar to this image:


    5. Select "Analyze" from the left menu.

    6. Then click on "Open Command Shell Window". A command prompt window will display.
    7. At this command prompt window, type: "diskpart" (one word, without quotes) and hit enter. The prompt now changed to "DISKPART>"
    8. Now type "list disk" and hit enter. You should now see a list of all available disks. Base on the size of each disk listed, find the one that matching your SD card (or thumb drive) and note its disk number under "Disk ###". If you don't see your SD card (or flash drive) listed, verify if it is inserted or plugged in (you might need to restart the computer and try again).
    9. Type "select disk " (replace with the disk # noted from the previous step) then hit enter.
      Important!! Besure to select the correct disk (your SD card or thumb drive) as you will be erasing the drive.
      Sample image with a 4-GB SD selected:


    10. Create a primary partition for the the disk by executing the following sequence of commands:
      clean
      create partition primary
      select partition 1
    11. Set the primary partition active, type: "active" and hit enter
    12. Perform a quick format with the following command:
      format fs=fat32 quick
    13. Then type:
      assign
      exit
    14. Your SD card (or the flash drive) is now bootable and will act similar to a local hard drive. In order to boot this card with Symantect Ghost Recovery, copy all contents from the Symantec Ghost disc to the SD card (or the flash drive). Besure to copy everything including any hidden files/folders.

      The SD card or flash drive is now bootable and will boot your laptop/netbook to Symantec Ghost Recovery utilities exactly the same way as of the CD (To boot with the card on your laptop/netbook, don't forget to set your bios to search for the SD card or USB external devices in the boot sequence).

    Convert any Document or Web Page to PDF

    Convert Any Document or Web Page to PDF

    Somebody just told you that you need to have Adobe Acrobat (Writer) to create a PDF file? Guess what, you can get away from that pricey piece of software if you just need to convert some documents to pdf, without a need of fancy editing the pdf document.
    Here's how. Thanks to the BullZip, who provides a Free Pdf printer. With this free tool, you can simply "print out" your document or webpage to a pdf file, just about the same way as you print it out to a printer.
    You can visit BullZip.com for more information about the software.
    Here the direct link to BullZip downloads page: Downloads
    1. To get started, first follow the link above and download Free Pdf Printer from BullZip, then install it to your computer.
    2. Once you're done, you might need to close the program (or the web browser) which you're currently viewing the document. This helps refreshing the list of available printers on your computer.
    3. Once you get back to the document you want to convert, perform the same steps are you print out the document, i.e. File > Print ...
    4. When you see the Print window pop-up, select "Bullzip PDF Printer" under "Printers", then click "OK".
    5. BullZip PDF Printer will then start to analyze your document and display a new pop-up window, where you can direct it to the location you want to save the pdf file.
    6. Follow the pop-up windows and.. hola! The PDF document is created!

    Basic Shortcut Keys

    The followings are some basic PC shortcut keys that are supported in most IBM compatible computers. They are also supported in most application software.
    Use at your own risk.
    Shortcut KeysSupported Window VersionsDescription
    Alt + e95, 98, ME, NT, 2000, XP, VistaPull down the top Edit menu.
    Alt + f95, 98, ME, NT, 2000, XP, VistaPull down the top File menu
    Ctrl + a95, 98, ME, NT, 2000, XP, VistaSelect all text.
    Ctrl + c95, 98, ME, NT, 2000, XP, VistaCopy selected item(s) (to clipboard).
    Ctrl + f95, 98, ME, NT, 2000, XP, VistaFind.
    Ctrl + v95, 98, ME, NT, 2000, XP, VistaPaste copied item(s) from clipboard
    Ctrl + x95, 98, ME, NT, 2000, XP, VistaCut.
    Ctrl + Ins95, 98, ME, NT, 2000, XP, VistaSame as Ctrl + c
    Ctrl + (left arrow)95, 98, ME, NT, 2000, XP, VistaMove one word to the left at a time.
    Ctrl + (right arrow)95, 98, ME, NT, 2000, XP, VistaMove one word to the right at a time.
    Shift + Ins95, 98, ME, NT, 2000, XP, VistaSame as Ctrl + v
    Shift + Delelte (or Del)95, 98, ME, NT, 2000, XP, VistaCut. Or permanently delete selected item(s) on Windows Explorer.
    F195, 98, ME, NT, 2000, XP, VistaHelp.
    Home95, 98, ME, NT, 2000, XP, VistaJump to the beginning of the line or page.
    Ctrl + Home95, 98, ME, NT, 2000, XP, VistaJump to the beginning of the document or page.
    End95, 98, ME, NT, 2000, XP, VistaJump to the end of the line or page.
    Ctrl + End95, 98, ME, NT, 2000, XP, Vistaump to the end of the document or page.
    Shift + Home95, 98, ME, NT, 2000, XP, VistaSet selection (highlight) from current position to beginning of the line or page.
    Shift + End95, 98, ME, NT, 2000, XP, VistaSet selection (highlight) from current position to end of the line or page.
    Shift + (left arrow)95, 98, ME, NT, 2000, XP, VistaSet selection (highlight) from current position to the left, one character at a time.
    Shift + (right arrow)95, 98, ME, NT, 2000, XP, VistaSet selection (highlight) from current position to the right, one character at a time.
    Shift + (down arrow)95, 98, ME, NT, 2000, XP, VistaSet selection (highlight) from current position to the next line down.
    Shift + (up arrow)95, 98, ME, NT, 2000, XP, VistaSet selection (highlight) from current position to the next line up.

    Reset Windows Password

    Reset Windows Password

    Forgot your administrator password? Don't panic, it happens to some other people too, and you have found the solution! The following instructions will show you step-by-step how to reset your local Windows password. This only works for local user accounts, however, not domain accounts.The password recovery tool from this page is written by Petter Nordahl-Hagen, and the original information, as well as the downloadable tool, can be found from his website. According to the author, this tool should work for Windows NT/2000/XP/Vista.
    WARNING! Users who have EFS encrypted files on the Windows XP or Vista computers will loose access to the EFS encrypted files after recovery of your password!
    Use this trick at your own risks
    The tool to reset your password can be downloaded here.

    I. Download the bootdisk:
    1. Download the bootdisk, which includes the password recovery tool here. The file contains the ISO CD image.
    2. Unzip (extract) the ISO file and burn it to a CD. Note that this is an ISO file, you must burn it to CD as an ISO image, not as a "data" file. If you're not sure how, see this article. Also, the image is bootable, you need to burn the image to a CD using the image burning feature; do not extract the contents of the ISO and burn them to the CD, you'll end up with a CD that can't boot!

    II. Understanding the process:
    • You'll use the bootdisk created from the above steps to bootup your computer, which you want to reset your administrator password.
    • You'll be asked for things like: which drive is the boot drive, which path to the SAM file, etc.. but don't worry, details will be provided.
    • Once you have selected an account to reset the password, you'll need to type in a new password; however, it is highly recommended to use a BLANK password at this point, then you can change your password later in Windows.
    • Follow the prompts to the end. You'll need to save the changes at the end!

    III. OK! Enough talking. Here are the steps:
    1. Startup your computer with the bootdisk created above. You should see a welcome screen following with a prompt:
       boot:
      
    2. Just wait, the bootup process will continute automatically. Then you should see a screen similar to this:
       =========================================================
       . Step ONE: Select disk where the Windows installation is
       =========================================================
       ....
       NT partitions found:
        1 :   /dev/sda1    4001MB  Boot
        2 :   /dev/sda5    2148MB
       
       Please select partition by number or
       a = show all partitions, d = automatically load new disk drivers
       m = manually load new disk drivers
       l = relist NTFS/FAT partitions, q = quit
       Select: [1]
      
    3. Notice the last line "Select: [1]" which shows the [1] as default selection because the tool detected the bootup partition is [1]. This might be different on your own machine, so you should review the list shown under "NT partitions found:". The partition with the word "Boot" should be selected.
    4. Hit Enter once you confirm the selection. You should see a similar screen as follows:
       =========================================================
       . Step TWO: Select PATH and registry files
       =========================================================
       ....
       What is the path to the registry directory? (relative to windows disk)
       [windows/system32/config] :
      
    5. Notice the last line "[windows/system32/config]" which shows the default path. This was also detected by the tool. If the path is correct, hit Enter, or if you wish to enter a different path, enter it now then hit Enter.
      Here are the paths for different versions of Windows:
      - Windows NT 3.51: winnt35/system32/config
      - Windows NT 4 and Windows 2000: winnt/system32/config
      - Windows XP/2003 (and often Windows 2000 upgraded from Windows 98 or earlier): windows/system32/config
    6. Once you hit "Enter", you should see the next screen similar to the following:
       -r--------    1 0        0          262144 Jan 12 18:01 SAM
       -r--------    1 0        0          262144 Jan 12 18:01 SECURITY
       -r--------    1 0        0          262144 Jan 12 18:01 default
       -r--------    1 0        0         8912896 Jan 12 18:01 software
       -r--------    1 0        0         2359296 Jan 12 18:01 system
       dr-x------    1 0        0            4096 Sep  8 11:37 systemprofile
       -r--------    1 0        0          262144 Sep  8 11:53 userdiff
      
       Select which part of registry to load, use predefined choices
       or list the files with space as delimiter
       1 - Password reset [sam system security]
       2 - RecoveryConsole parameters [software]
       q - quit - return to previous
       [1]
      
    7. Hit "Enter" with the default option selected "[1]". Then ...:
       =========================================================
       . Step THREE: Password or registry edit
       =========================================================
       Loaded hives:   
      
         1 - Edit user data and passwords
         2 - Syskey status & change
         3 - RecoveryConsole settings
          - - -
         9 - Registry editor, now with full write support!
         q - Quit (you will be asked if there is something to save)
      
       What to do? [1] -> 1
      
    8. Hit "Enter" with the default option selected "[1]". Then ...:
       ===== chntpw Edit User Info & Passwords ====
      
       RID: 01f4, Username: 
       RID: 01f5, Username: , *disabled or locked*
       RID: 03e8, Username: , *disabled or locked*
       RID: 03eb, Username: , *disabled or locked*
       RID: 03ea, Username: , *disabled or locked*
      
       Select: ! - quit, . - list users, 0x - User with RID (hex)
       or simply enter the username to change: [Administrator]
      
    9. Hit "Enter" with the default option selected "[Administrator]", or select another user account. Here you can enter the full user account surrounded by < and >, CASE-SENSITIVE, or enter the RID number (i.e. 0x1f4). Assuming you select the Administrator account, you should see the following screen:
       RID     : 0500 [01f4]
       Username: Administrator
       fullname: 
       comment : Built-in account for administering the computer/domain
       homedir : 
      
       Account bits: 0x0210 =
       [ ] Disabled        | [ ] Homedir req.    | [ ] Passwd not req. | 
       [ ] Temp. duplicate | [X] Normal account  | [ ] NMS account     | 
       [ ] Domain trust ac | [ ] Wks trust act.  | [ ] Srv trust act   | 
       [X] Pwd don't expir | [ ] Auto lockout    | [ ] (unknown 0x08)  | 
       [ ] (unknown 0x10)  | [ ] (unknown 0x20)  | [ ] (unknown 0x40)  | 
      
       Failed login count: 0, while max tries is: 0
       Total  login count: 3
      
       * = blank the password (This may work better than setting a new password!)
       Enter nothing to leave it unchanged
       Please enter new password: *
      
    10. At the prompt "Please enter new password", Enter the * for a blank password (HIGHLY RECOMMENDED!) then press Enter
       Please enter new password: *
       Blanking password!
      
       Do you really wish to change it? (y/n) [n] y
      
    11. At the prompt, type in "y", then press Enter. Note that the default option is "n".
       Do you really wish to change it? (y/n) [n] y
       Changed!
      
       Select: ! - quit, . - list users, 0x - User with RID (hex)
       or simply enter the username to change: [Administrator] !
      
    12. Enter the "!" to go back to the main menu. Then select "q" at the following menu to quit:
       <>========<> chntpw Main Interactive Menu <>========<>
      
       Loaded hives:   
      
         1 - Edit user data and passwords
         2 - Syskey status & change
         3 - RecoveryConsole settings
          - - -
         9 - Registry editor, now with full write support!
         q - Quit (you will be asked if there is something to save)
      
       What to do? [1] -> q
      
    13. A prompt to save changes displays, enter "y" to save:
       =========================================================
       . Step FOUR: Writing back changes
       =========================================================
       About to write file(s) back! Do it? [n] : y
      
    14. The changes are saved! You should see the following screen, press Enter, and reboot your computer.
       Writing  sam
      
       ***** EDIT COMPLETE *****
      
       You can try again if it somehow failed, or you selected wrong
       New run? [n] : n
      
      
      Source: thecomputertricks.com

    Wednesday, June 5, 2013

    Top 10 Windows 8 tips and tricks

    Customize your tiles
    Windows 8 tilesMake the most of your Windows Start screen tiles by adjusting the sizes, where they are located, and what is listed.
    • Move any tile by clicking and dragging the tile. While moving a tile, if you need a larger view of the Start screen move the tile towards the top or bottom of the screen to zoom out.
    • Use your mouse wheel to scroll left-to-right through your tiles.
    • Any Desktop shortcut or program can be pinned to the Start screen by right-clicking the icon and choosing Pin to Start.
    • In the bottom right-hand corner of the start screen is a magnifying glass with tiles, click this icon to get a zoomed out view of your Start screen. In this view, if you right-click on a group of tiles you'll be given the option to name group, which can be useful if you have a group of related tiles (e.g. games). In this view, you can also click and drag a group to organize your tile groups.
    • Create a new speed bump between tile groups by moving a tile to a speed bump.
    • Resize any User tile or Live tile by right-clicking the tile and choosing resize.
    • If there is a tile you want on your Taskbar, right-click the tile and choose Pin to taskbar.
    • Show admin applications on the Start screen by clicking Settings in Charms, click Settings, and change the Show administrative tools from No to Yes.
    • In Internet Explorer 10, you can also pin any of your favorite web pages to your Start Screen.
    Windows 8 keyboard shortcuts
    Knowing at least some of the Windows 8 keyboard shortcuts will make your Windows 8 experience much more enjoyable. Try to memorize these top Windows 8 shortcut keys.
    • Press the Windows key to open the Start screen or switch to the Desktop (if open).
    • Press the Windows key + D will open the Windows Desktop.
    • Press the Windows key + . to pin and unpin Windows apps on the side of the screen.
    • Press the Windows key + X to open the power user menu, which gives you access to many of the features most power users would want (e.g. Device Manager and Command Prompt).
    • Press the Windows key + C to open the Charms.
    • Press the Windows key + I to open the Settings, which is the same Settings found in Charms.
    • Press and hold the Windows key + Tab to show open apps.
    • Press the Windows key + Print screen to create a screen shot, which is automatically saved into your My Pictures folder.
    See our Windows shortcuts page for a full listing of all Windows shortcuts.
    Know your hot corners
    The corners on your screen are hot corners and give you access to different Windows features. Below, is a brief explanation of each of these corners.
    Bottom Left-hand corner
    The bottom left-hand hot corner of the screen will allow you to access the Start screen, if you're in the Start screen and have the Desktop open, this corner will open the Desktop from the Start screen.
    Tip: Right-clicking in the left hand corner will open the power user menu.
    Top-left corner of the screen
    Moving the mouse to the top-left corner and then down will display all the apps running on the computer. Clicking and dragging any of these apps to the left or right-hand side of the screen will snap that app to that side of the screen. Each of these open app icons can also be right-clicked to close or snap.
    Right-hand side of the screen
    On the full right-hand side of the screen will be given access to the Windows Charms.
    Taking advantage of search
    The Search in Windows 8 has been significantly improved when compared to all previous versions of Windows. To search for a file or run a program in Windows 8 from the Start screen just start typing what you're trying to find or want to run.
    As you begin typing, the results will start appearing on the left-hand side. In addition to being able to search for files and run programs, the Search also supports limiting the search to apps such as Finance, People, Maps, Photos, Mail, Music, Videos, Weather, and much more. If what you are searching for is not a file or program, click on the app you wish to use as the search. For example, if you were searching for "New York" and selected the Weather App you would be shown the weather in New York, NY.
    By default, Search organizes the available Apps by how frequently they are used and then in alphabetical order. If you want to keep your favorite app at the top of the Search list, right-click the app and choose Pin. Pinning the app will lock it in place regardless of how often it is used. If there is an app you don't want (e.g. Finance) you can turn on and off any of the search apps through the PC settings, which is found under the Settings in the Charms.
    Bonus tip: The Search is also found through Charms and can also be opened by pressing Windows key + F.
    Running two apps side by side
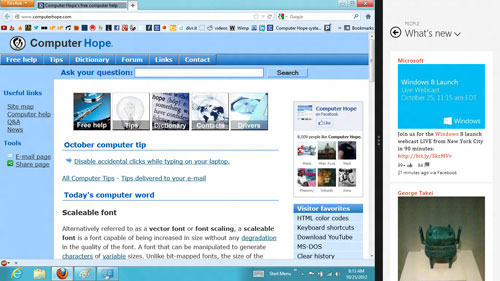
    Any app can be pinned to the left or right-hand side of the screen. For example, open the People app and then press the Windows Key + . (period) to move that app to the right-hand side of the screen, pressing the same keys again will move it to the left-hand side, and pressing the same keys again will make it full screen. While an app is pinned, any other app or program can be opened and loaded into the available space on the screen. For example, in the below picture, we've opened a browser window and have the People app running to monitor our social networks.
    Windows 8 People
    Any open app can also be pinned using your mouse by clicking at the top of the tile and dragging it to the left or right-hand side of the screen.
    Bonus tip: The Desktop can also be pinned to the left or right-hand side of the screen.
    Note: In order for snap to work properly your resolution must be at least 1,366 x 768.
    Windows 8 Task Manager
    The Windows 8 
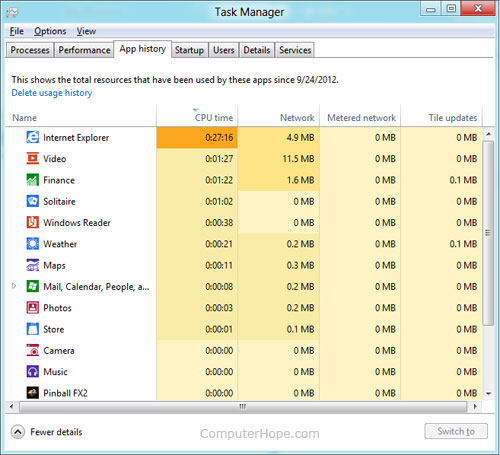
Task Manager has been significantly improved over previous versions of Windows. Some of the new changes include showing a total percent usage at the top of your Processes, which makes it easier to determine total memory and CPU usage, improved Performance graphs, a Startup tab to see startup processes and their impact to system performance, and the App history tab (as shown below) that gives you the total resources an app has used over a period of time. Press Ctrl + Shift + Esc to start exploring the new Task Manager.
    Windows 8 Task Manager
    Use a picture password to log into your computer
    Windows 8 includes a new feature called Picture password, which allows you to authenticate with the computer using a series of gestures that include circles, straight lines, and taps. Enable this feature if you want a new way to access your computer or have a hard time with passwords.
    1. Open the Windows Charms.
    2. Click Settings and then More PC settings
    3. In the PC settings window click Users and then select Create a picture password
    Bonus tip: A four digit pin password can also be created and used to access your computer.
    Take advantage of Windows 8 apps
    Windows 8 comes included with several apps to help you get the most from your computer. Below are just a few of the included apps.
    People
    Microsoft touts the People feature in Windows 8 because they understand how many people are using social networks today. In the People feature you'll be able to connect your Windows computer to all the major social networks including FacebookLinkedIn, and Twitter. Once connected, you can pin the people app and monitor your social network (as shown below), use People in Search to find people, and get an overview of what is happening in all your social networks.
    Windows 8 People
    Reader
    The Reader app will give you PDF support right out of the box.
    SkyDrive
    The SkyDrive app will give you access to the Microsoft cloud service SkyDrive, which allows you to store your photos, documents, and other files in the cloud and access or share those files with any computer with Internet access.
    Store
    Take advantage of the Windows Store and install one or more of the thousands of available apps designed for Windows 8. The Store is found in the Start screen, or use Search to search the Store app for any apps that you are trying to find.
    Know the answers to common questions
    Windows 8 is the biggest change to Microsoft Windows since the introduction of Windows 95, which was released all the way back in 1995. Since so many people have grown up with Windows, it can be difficult to transition to a new way of doing things. Below, is a short list of the most common questions previous Windows users will have.
    Know the Jargon
    Knowing all the new jargon introduced with Windows 8 will help improve your familiarity with Windows 8 and make it a more enjoyable experience. Below, are just a few links to the most commonly used Windows 8 terms.
    Source: computerhope.com

    USE KEYBOARD WITH MOUSE (ON SCREEN KEYBOARD)

    USE KEYBOARD WITH MOUSE

    If you feel that your external keyboard is not working properly or some particular key is not functioning then you can use internal keyboard on your desktop screen. This property of keyboard is found in windows xp and seven. Just follow these steps
    Go to start menu and press “run
    Type  “osk
    Now press enter.
    (note. Don’t use commas)
    you will see keyboard on your desktop screen. Now use mouse to click on keys for operation.